thinkphp上传图片 jquery预览 thinkphp jquery实现图片上传和预览效果
静深的成长笔记 人气:0想了解thinkphp jquery实现图片上传和预览效果的相关内容吗,静深的成长笔记在本文为您仔细讲解thinkphp上传图片 jquery预览的相关知识和一些Code实例,欢迎阅读和指正,我们先划重点:thinkphp上传图片,jquery图片预览,php图片上传预览,下面大家一起来学习吧。
先上效果图:
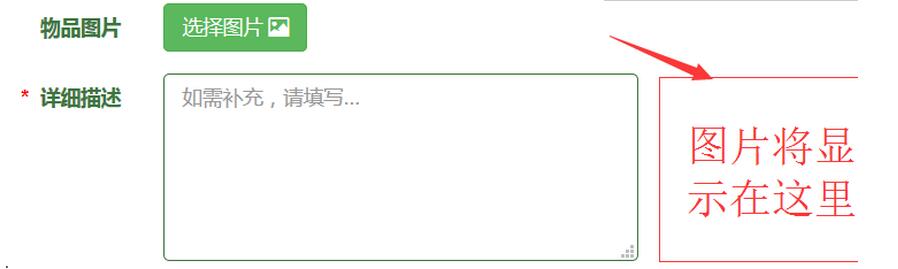
那个file按钮样式先忽略
点击选择图片(浏览),随便选一张图片

js代码如下
//上传图片立即预览
 function PreviewImage(imgFile) {
 var filextension = imgFile.value.substring(imgFile.value
 .lastIndexOf("."), imgFile.value.length);
 filextension = filextension.toLowerCase();
 if ((filextension != '.jpg') && (filextension != '.gif')
 && (filextension != '.jpeg') && (filextension != '.png')
 && (filextension != '.bmp')) {
 alert("对不起,系统仅支持标准格式的照片,请您调整格式后重新上传,谢谢 !");
 imgFile.focus();
 } else {
 var path;
 if (document.all)//IE
 {
 imgFile.select();
 path = document.selection.createRange().text;
 document.getElementById("photo_info").innerHTML = "";
 document.getElementById("photo_info").style.filter = "progid:DXImageTransform.Microsoft.AlphaImageLoader(enabled='true',sizingMethod='scale',src=\""
  + path + "\")";//使用滤镜效果
 } else//FF
 {
 path = window.URL.createObjectURL(imgFile.files[0]);// FF 7.0以上
 //path = imgFile.files[0].getAsDataURL();// FF 3.0
 document.getElementById("photo_info").innerHTML = "<img id='img1' width='120px' height='100px' src='"+path+"'/>";
 //document.getElementById("img1").src = path;
 }
 }
 }
html代码,其实不重要啦
<div class="form-group has-success has-feedback">
  <label for="info_photo" class="col-sm-2 control-label">物品图片</label>
  <div class="col-sm-10">

  <span class="btn btn-success btn-file"> 选择图片 <span
   class="glyphicon glyphicon-picture" aria-hidden="true"></span>
   <input type="file" name="info_photo" value="" id="info_photo"
   onchange='PreviewImage(this)' />
  </span>
  </div>

  </div>

  <div class="form-group has-success has-feedback">
  <label for="info_desc" class="col-sm-2 control-label"><span
  style="color: red;">* </span> 详细描述</label>
  <div class="col-sm-10">
  <textarea class="form-control" rows="5" id="info_desc"
   name="info_desc" placeholder="如需补充,请填写..." title="可包含中文数字和常用字符"></textarea>
  <div id="photo_info" class="photo_info"></div>
  </div>
  </div>
css代码就不上了啊
顺便补充一下thinkphp上传图片代码,把整个发布消息都拷过了算了
public function loseThing(){
 $m=M('info');
 $m->create();
 $upload = new \Think\Upload();// 实例化上传类
 $upload->maxSize = 3145728 ;// 设置附件上传大小
 $upload->exts = array('jpg', 'gif', 'png', 'jpeg','bmp');// 设置附件上传类型
 $upload->rootPath = './Public/';
 $upload->savePath = '/Uploads/'; // 设置附件上传目录
 $upload->autoSub = false;
 // 上传文件
 $info = $upload->upload();
 if($info) {
 // 上传成功
 foreach($info as $file){
 $m->info_photo=$file['savename'];
 }
 }
 $m->create_time=date('Y-m-d H:i:s',time());
 $m->uid=$_SESSION['id'];
 $m->username=$_SESSION['username'];
 /* $m->user_img=$_SESSION['filename']; */

 $m->info_type="寻物启事";//信息类型为失物
 $lastId=$m->add();
 if($lastId){
 $this->success('发布成功');
 }else{
 $this->error('发布失败,请先登录');
 }
 }
加载全部内容