Python ZeroMQ知识总结 Python网络编程之ZeroMQ知识总结
机器学习算法与Python实战 人气:0想了解Python网络编程之ZeroMQ知识总结的相关内容吗,机器学习算法与Python实战在本文为您仔细讲解Python ZeroMQ知识总结的相关知识和一些Code实例,欢迎阅读和指正,我们先划重点:Python,ZeroMQ知识总结,python网络编程,Python,ZeroMQ,下面大家一起来学习吧。
一、ZeroMQ概述
- ZeroMQ(又名ØMQ,MQ,或zmq)像一个可嵌入的网络库,但其作用就像一个并发框架。
- ZeroMQ类似于标准Berkeley套接字,其提供了各种传输工具,如进程内、进程间、TCP和组播中进行原子消息传送的套接字
- 可以使用各种模式实现N对N的套接字连接,这些模式包括:发布-订阅、任务分配、请求-应答。
- ZeroMQ的速度足够快,因此可充当集群产品的结构。
- ZeroMQ的异步I/O模型提供了可扩展的多核应用程序,用异步消息来处理任务
- ZeroMQ核心由C语言编写,支持C、C++、java、python等多种编程语言的API,并可运行在大多数操作系统上
总结以下:ØMQ (ZeroMQ) 是一个基于消息队列的多线程网络库,它封装了网络通信、消息队列、线程调度等功能,向上层提供简洁的API,应用程序通过加载库文件,调用API函数来实现高性能网络通信。
看起来有些抽象,下面我们结合ZeroMQ 的 Python 封装———— pyzmp,用实例看一下ZeroMQ的三种最基本的工作模式。
二、安装
安装方法
pip install pyzmq
查看是否安装成功
>>> import zmq
>>> print(zmq.__version__)
22.0.3
三、Request-Reply (请求响应模式)
3.1 Request-Reply模式概述:
- 消息双向的,有来有往。
- Client请求的消息,Server必须答复给Client。
- Client在请求后,Server必须回响应,注意:Server不返回响应会报错。
- Server和Client都可以是1:N的模型。通常把1认为是Server,N认为是Client。
- 更底层的端点地址是对上层隐藏的,每个请求都隐含回应地址,而应用则不关心它。
- ZMQ 可以很好的支持路由功能(实现路由功能的组件叫做 Device),把 1:N 扩展为 N:M(只需要加入若干路由节点)。

3.2 Client端python实现
#client.py

import zmq

context = zmq.Context()

#  Socket to talk to server
print("Connecting to hello world server…")
socket = context.socket(zmq.REQ)
socket.connect("tcp://localhost:5555")
socket.send(b"Hello")
#  Get the reply.
message = socket.recv()
print(f"Received reply [ {message} ]")
3.3 Server端python实现
#server.py
import time
import zmq

context = zmq.Context()
socket = context.socket(zmq.REP)
socket.bind("tcp://*:5555")

while True:
    #  Wait for next request from client
    message = socket.recv()
    print("Received request: %s" % message)

    #  Do some 'work'
    time.sleep(1)

    #  Send reply back to client
    socket.send(b"World")
- 启动client.py 首先会打印Connecting to hello world server… 但不会受到任何消息。
- 然后启动server.py ,客户端收到来自客户端的request: b'Hello'
- 此时client端收到来自server端的 reply: [ b'World' ]
python client.py
Connecting to hello world server…
Received reply [ b'World' ]
python server.py
Received request: b'Hello'
可以试一下,多运行几个client.py,看看情况是什么样的。

四、Publish/Subscribe(订阅-发布模式 )
4.1 Pub-Subs模式概述:
- 消息单向,有去无回
- 一个发布端,多个订阅端;发布端只管产生数据,发布端发布一条消息,可被多个订阅端同时收到。
- 发布者不必关心订阅者的加入和离开,消息会以 1:N 的方式扩散到每个订阅者。
- 广播所有client,没有队列缓存,断开连接数据将永远丢失。
- 如果Publish端开始发布信息时,Subscribe端尚未连接进来,则这些信息会被直接丢弃。
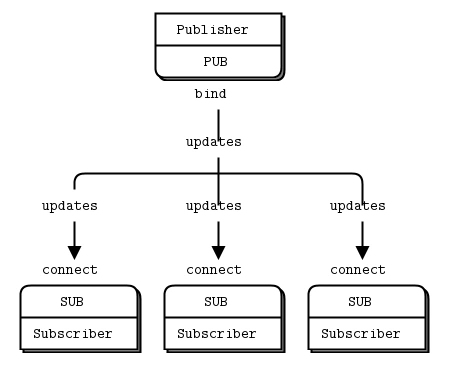
- PUB和SUB谁bind谁connect并无严格要求(虽本质并无区别),但仍建议PUB使用bind,SUB使用connect
- 使用SUB设置一个订阅时,必须使用zmq_setsockopt()对消息进行过滤
这里直接引用官方文档的例子:
发布者:类似于一个天气更新服务器,向订阅者发送天气更新,内容包括邮政编码、温度、湿度等信息
#Publisher.py
import zmq
from random import randrange


context = zmq.Context()
socket = context.socket(zmq.PUB)
socket.bind("tcp://*:5556")

while True:
    zipcode = randrange(1, 100000)
    temperature = randrange(-80, 135)
    relhumidity = randrange(10, 60)

    socket.send_string("%i %i %i" % (zipcode, temperature, relhumidity))
订阅者:它监听发布者更新的数据流,过滤只接收与特定邮政编码相关的天气信息,默认接收接收10条数据
#Subscribe.py
import sys
import zmq


#  Socket to talk to server
context = zmq.Context()
socket = context.socket(zmq.SUB)

print("Collecting updates from weather server...")
socket.connect("tcp://localhost:5556")

# Subscribe to zipcode, default is NYC, 10001
zip_filter = sys.argv[1] if len(sys.argv) > 1 else "10001"

# Python 2 - ascii bytes to unicode str
if isinstance(zip_filter, bytes):
    zip_filter = zip_filter.decode('ascii')
socket.setsockopt_string(zmq.SUBSCRIBE, zip_filter)

# Process 5 updates
total_temp = 0
for update_nbr in range(5):
    string = socket.recv_string()
    zipcode, temperature, relhumidity = string.split()
    total_temp += int(temperature)

print(
    "Average temperature for zipcode '%s' was %dF"
    % (zip_filter, total_temp / (update_nbr + 1))
)

五、Push/Pull(流水线模式)
5.1 流水线模式概述:
- 主要用于多任务并行。
- 消息单向,有去无回。
- Push的任何一个消息,始终只会有一个Pull端收到消息。
- Push 端还是 Pull 端都可以做 server,bind 到某个地址等待对方访问。
- 如果有多个PULL端同时连接到PUSH端,则PUSH端会在内部做一个负载均衡,采用平均分配的算法,将所有消息均衡发布到PULL端上。
- 由三部分组成,Push进行数据推送,work进行数据缓存,Pull进行数据竞争获取处理。
- 存在一个数据缓存和处理负载,当连接被断开,数据不会丢失,重连后数据继续发送到对端。

ventilator 使用的是 SOCKET_PUSH,将任务分发到 Worker 节点上。Worker 节点上,使用 SOCKET_PULL 从上游接受任务,并使用 SOCKET_PUSH 将结果汇集到 Sink。值得注意的是,任务的分发的时候也同样有一个负载均衡的路由功能,worker 可以随时自由加入,ventilator 可以均衡将任务分发出去。
Push/Pull模式还是蛮常用的,这里我们主要测试一下它的负载均衡。
5.2 Ventilator
# ventilator.py
import zmq
import time

context = zmq.Context()
socket = context.socket(zmq.PUSH)
socket.bind("tcp://*:5557")

while True:
    socket.send(b"test")
    print("已发送")
    time.sleep(1)
5.3 worker
# worker.py
import zmq

context = zmq.Context()

recive = context.socket(zmq.PULL)
recive.connect('tcp://127.0.0.1:5557')

sender = context.socket(zmq.PUSH)
sender.connect('tcp://127.0.0.1:5558')

while True:
    data = recive.recv()
    print("work1 正在转发...")
    sender.send(data)
5.4 sink
# sink.py
import zmq
import sys

context = zmq.Context()
socket = context.socket(zmq.PULL)
socket.bind("tcp://*:5558")

while True:
    response = socket.recv()
    print("response: %s" % response)
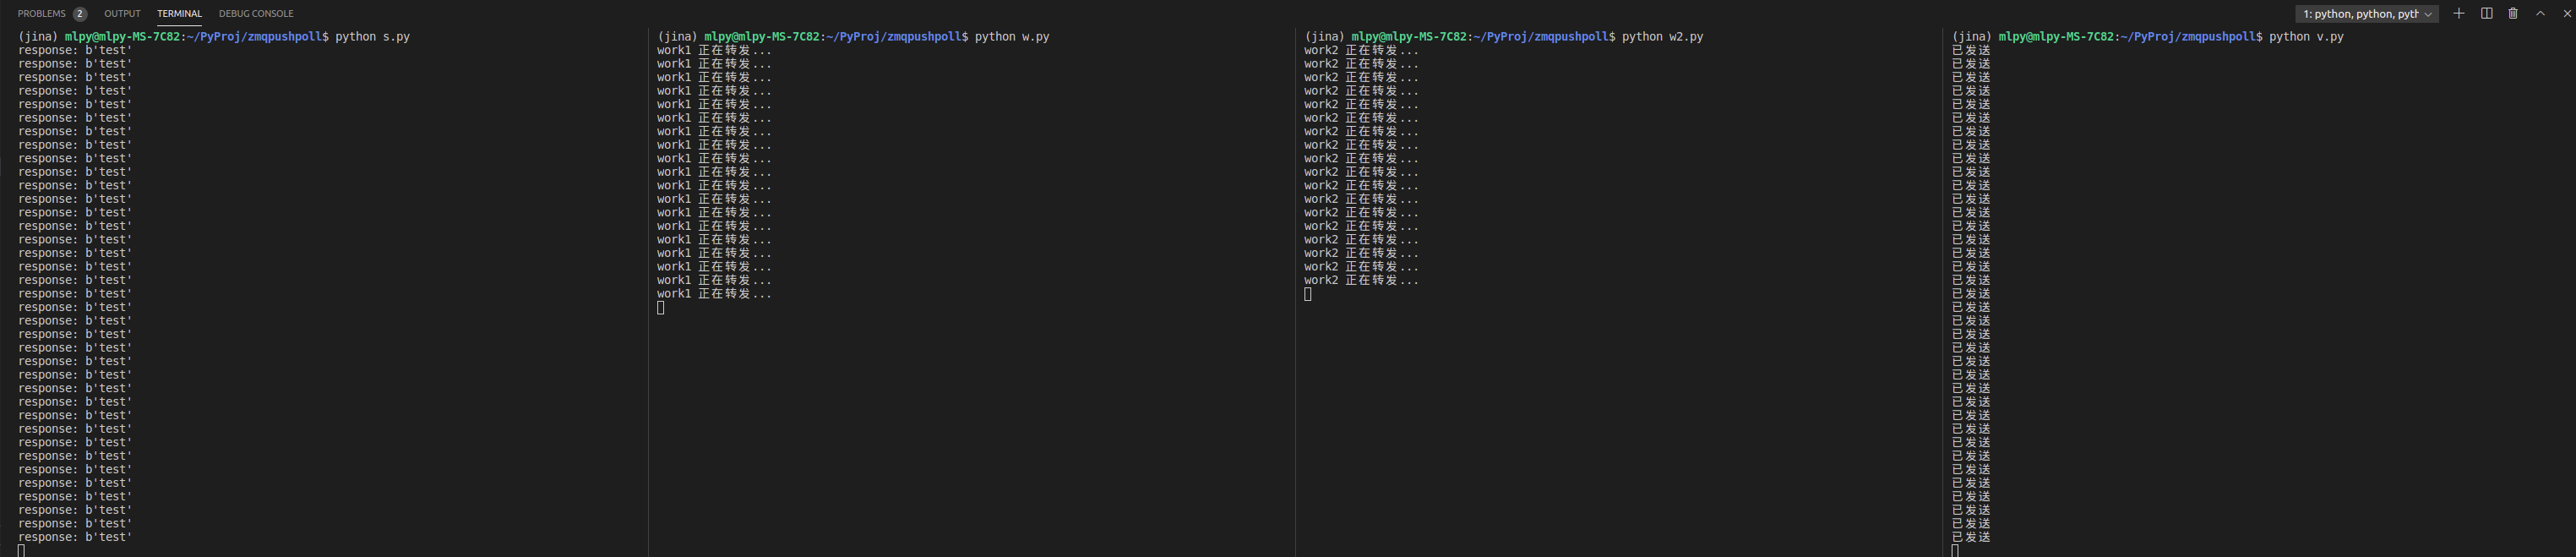
打开4个Terminal,分别运行
python sink.py
python worker.py
python worker.py
python ventilator.py
六、总结
消息模型可以根据需要组合使用,后续的代理模式和路由模式等都是在三种基本模式上面的扩展或变异。
加载全部内容