Vue的生命周期
Tree_wws 人气:01. 生命周期(重要)
1.1 初步认识生命周期
- 别名:生命周期回调函数、生命周期函数、生命周期钩子。
- 生命周期是什么?Vue在关键时刻帮我们调用的一些特殊名称的函数。
- 生命周期函数的名字不可更改,但函数内部的具体内容由程序员自行编写
- 生命周期函数中的this指向也是vm 或 组件实例对象。
1.2 生命周期流程(8个)
1.初始化
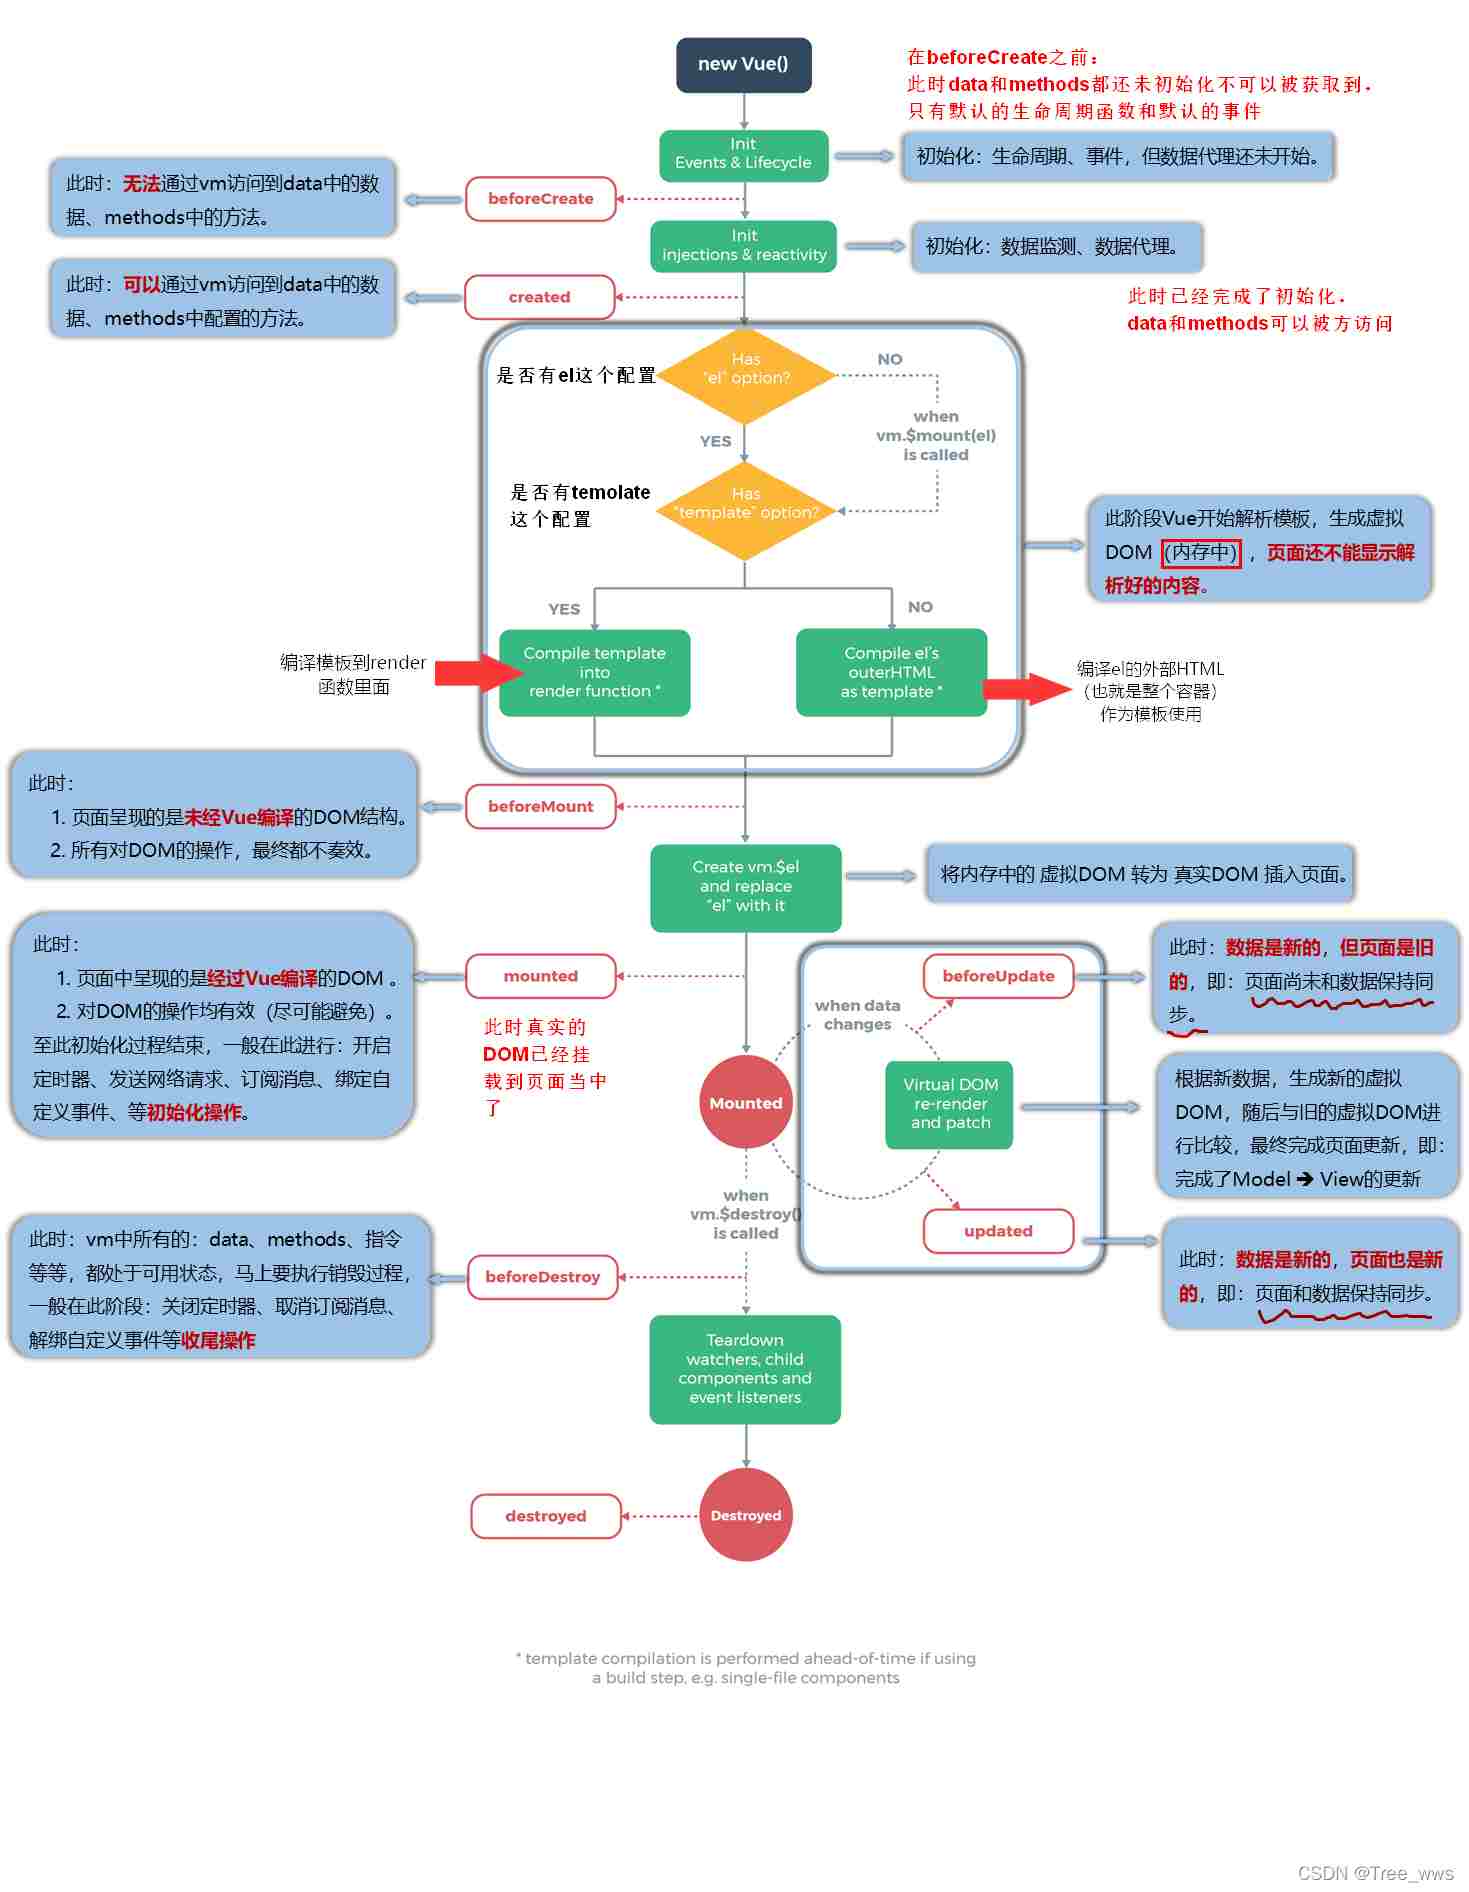
1.beforeCreate()
2.created()
2.挂载(页面渲染)
1.beforeMount()
2.mounted()
3.更新
1.beforeUpdate()
2.updated()
4.销毁
1.beforeDestory()
2.destoryed()
1.3 生命周期详细流程图
1.4 常用的生命周期钩子:
beforeCreate():可以配置全局事件总线,后面会讲到先提一嘴
mounted(): 可以在此阶段发送ajax请求, 启动定时器、绑定自定义事件、订阅消息等异步任务【初始化操作】
beforeDestroy(): 在此阶段做收尾工作, 如: 清除定时器、解绑自定义事件、取消订阅消息等【首尾工作】
1.4.1 关于销毁
- 销毁后借助Vue开发者工具看不到任何信息
- 销毁后自定义事件会失效,但原生DOM事件依然有效
- 一般不会在
beforeDestroy操作数据,因为即使操作数据,也不会再触发更新流程了。
1.4.2 关于父子组件的生命周期
1.加载渲染的过程
父beforeCreate ==> 父created ==> 父beforeMount ==> 子beforeCreate ==> 子created ==> 子beforeMount ==> 子mounted ==> 父mounted
2.更新的过程
父beforeUpdate ==> 子beforeUpdate ==> 子updated ==> 父updated
3.销毁过程
父beforeDestroy ==> 子beforeDestroy ==> 子destroyed ==> 父destroyed
1.5小案例
 <div id="root">
        <!-- 让h3透明度产生过渡的效果 -->
        <h3 :style="{opacity:opacity}">欢迎学习Vue!</h3>
        <button @click="des">点击我销毁</button>
    </div>
    <script>
        Vue.config.productionTip = false
        let vm = new Vue({
            el: '#root',
            data: {
                opacity: 1
            },
            methods: {
                des(){
                    // 触发此函数必定调用,beforeDestroy(),destroyed()
                    this.$destroy()
                }
            },
            mounted() { //挂载
                /*
                		- 完成模板解析后并且将初始的真实的DOM元素挂载到页面后,才执行的函数
                			只会执行一次
                		- this指向Vue
                		- 开发中常用的方法,当我们想要读取某个属性但是读不到,就可以
                		  将该属性绑定到共同能够访问到的元素上,例如下面定时器的例子
                */
                this.timer = setInterval(() => {
                    this.opacity -= 0.01
                    if (this.opacity <= 0)
                        this.opacity = 1
                }, 10);
            },
            beforeDestroy() {
                console.log("beforeDestroy - 清除定时器");
                clearInterval(this.timer)
            },
            destroyed() {
                console.log("destroyed - 销毁完毕")
            },
        })
    </script>
1.6 代码举例说明生命周期钩子
  <div id="root">
        <h3>n的值为:{{n}}</h3>
        <button @click="add">点击我n+1</button>
        <button @click="remove">点击销毁vm</button>
    </div>
    <script>
        Vue.config.productionTip = false
        let vm = new Vue({
            el: '#root',
            data: {
                n:1
            },
            methods: {
                add(){
                    this.n++
                },
                remove(){
                    this.$destroy()
                }
            },
            beforeCreate() {
                /*
                    此时初始化生命周期,事件等,数据代理还未开始
                    vm无法访问到data中的数据,methods中的方法
                */
                console.log("beforeCreate");
                //console.log(this.n);  //undefined
                // console.log(this.add()); // this.add is not a function
                // debugger
            },
            created() {
                /*
                    已经完成了初始化的数据监视和数据代理
                    vm可以访问到data中的数据和methods的方法
                */
                console.log("created");
                // console.log(this.n);  // 1
                // console.log(this.add());  // undefined
                // debugger
            },
            beforeMount() {
                /*
                    挂载之前,也就是图中的判断框里执行的,此阶段是Vue
                    在解析模板并且生成虚拟DOM存储在内存当中,页面还不能
                    看到解析后的样子
                 */
                 console.log("beforeMount");
                //  debugger
            },
            mounted() {
                /*
                    完成模板解析后并且将初始的真实的DOM元素挂载到页面后,才执行的函数
                    一般在此:开启一些定时器、发送网络请求、订阅消息、
                    绑定自定义事件等等初始化
                 */
                console.log("mounted");
                // debugger
            },
            beforeUpdate() {
                /*
                    当数据发生更新后,此时数据已经更新完成,但是页面
                    还是未更新的。
                    也就是面试所问的:页面和尚未和数据保持同步的阶段
                 */
                console.log("beforeUpdate");
            },
            updated() {
                /*
                    在这之前会进行新旧虚拟DOM比较,最终完成页面的更新
                    此阶段就是页面和数据保持同步
                 */
                 console.log("updated");
            },
            beforeDestroy() {
                /*
                    当我们调用vm.$destroy时,才会执行下面两个函数,
                    马上要执行销毁阶段,一般在这个阶段做一些收尾操作
                    比如:关掉定时器,取消订阅,解绑自定义事件
                 */
                console.log("beforeDestroy");
            },
            destroyed() {
                /*
                    所有的指令,所有的自定义事件监听器都没了(只留下原生的dom的事件)
                 */
                console.log("destroyed");
            },
        })
    </script>
总结
以上就是今天要讲的内容,本文介绍了生命周期的相关知识,希望对大家有所帮助!
加载全部内容