Vue生命周期
.NET开发菜鸟 人气:0什么是vue的生命周期
Vue中的生命周期是指组件从创建到销毁的一系列过程。看下面这张官方文档的图:

从图片中可以看出Vue的整个生命周期包括8个状态,按照先后顺序分别为:
- beforeCreate
- Created
- beforeMount
- mounted
- beforeUpdate
- updated
- beforeDestroy
- destroyed
Vue组件的生命周期共分为三个阶段,如下图所示:
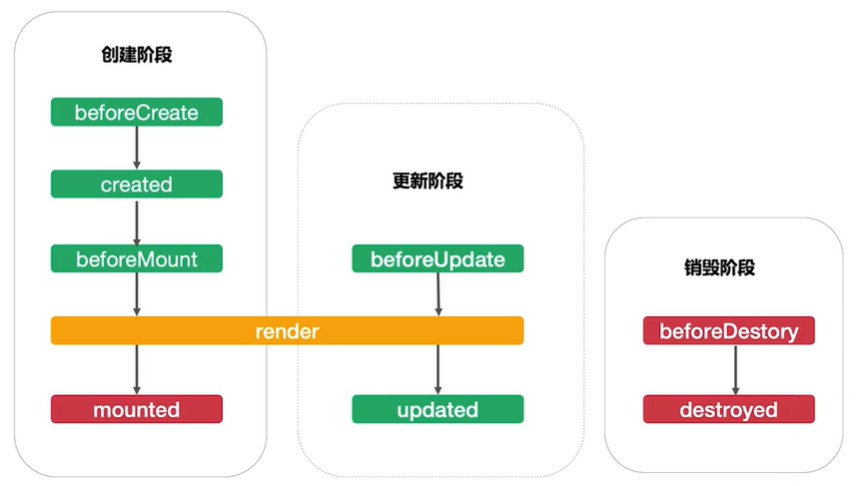
创建阶段和销毁阶段在组件的生命周期中只会执行一次,而更新阶段会执行多次。
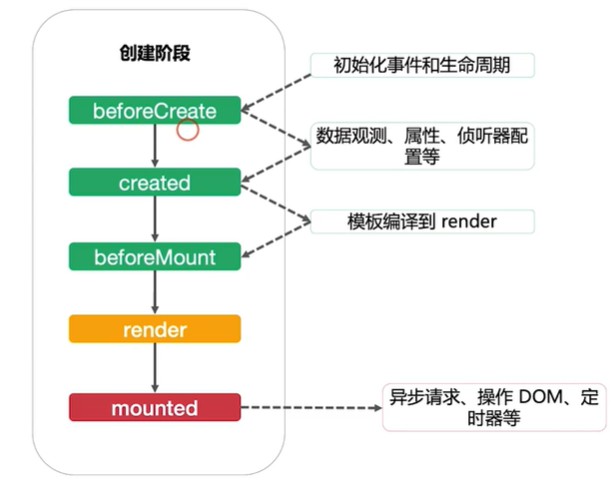
先看一下创建阶段完成的事情:
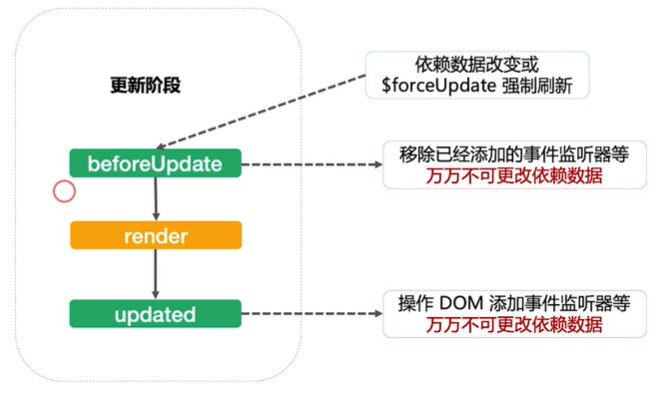
在看更新阶段完成的事情:
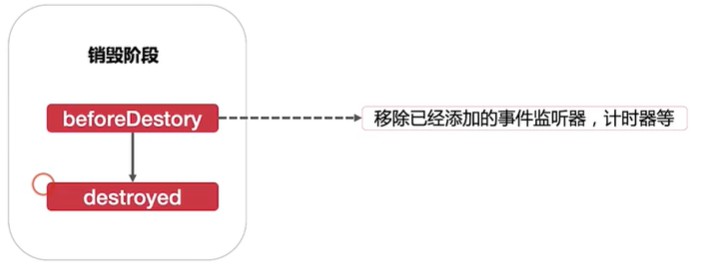
最后在看一下销毁阶段完成的事情:
先看下面的一段代码:
<!DOCTYPE html>
<html lang="en">
<head>
<meta charset="UTF-8">
<meta name="viewport" content="width=device-width, initial-scale=1.0">
<meta http-equiv="X-UA-Compatible" content="ie=edge">
<title>生命周期</title>
<!--引入vue.js-->
<script src="./js/vue.js" ></script>
<script>
window.onload=function(){
new Vue({
el:'#app',// 2.0不允许挂载到html,body元素上
data:{
msg:'welcome'
},
methods:{
update(){
this.msg="欢迎";
},
destroy(){
this.$destroy();
}
},
//创建前状态 el和data并未初始化
beforeCreate(){
console.group('------beforeCreate创建前状态------');
console.log("%c%s", "color:red" , "el : " + this.$el); //undefined
console.log("%c%s", "color:red","data : " + this.$data); //undefined
console.log("%c%s", "color:red","message: " + this.msg)
console.log('组件实例刚刚创建,还未进行数据观测和事件配置');
},
created(){//常用 创建完毕状态 完成了data数据的初始化 el没有
console.group('------created创建完毕状态------');
console.log("%c%s", "color:red","el : " + this.$el); //undefined
console.log("%c%s", "color:red","data : " + this.$data); //已被初始化
console.log("%c%s", "color:red","message: " + this.msg); //已被初始化
console.log("实例已经创建完成,并且已经进行数据观测和事件配置")
},
beforeMount(){ //挂载前状态 完成了el和data初始化
this.msg="112233";
console.group('------beforeMount挂载前状态------');
console.log("%c%s", "color:red","el : " + (this.$el)); //已被初始化
console.log(this.$el);
console.log("%c%s", "color:red","data : " + this.$data); //已被初始化
console.log("%c%s", "color:red","message: " + this.msg); //已被初始化
console.log("模板编译之前,还没挂载");
},
mounted(){//常用 挂载结束状态 完成挂载
console.group('------mounted 挂载结束状态------');
console.log("%c%s", "color:red","el : " + this.$el); //已被初始化
console.log(this.$el);
console.log("%c%s", "color:red","data : " + this.$data); //已被初始化
console.log("%c%s", "color:red","message: " + this.msg); //已被初始化
console.log("模板编译之后,已经挂载,此时才会有渲染页面,才能看到页面上数据的显示")
},
beforeUpdate(){ //更新前状态
console.group('------beforeUpdate 更新前状态------');
console.log("%c%s", "color:red","el : " + this.$el);
console.log(this.$el);
console.log("%c%s", "color:red","data : " + this.$data);
console.log("%c%s", "color:red","message: " + this.msg);
},
updated(){ //更新完成状态
console.group('------updated 更新完成状态------');
console.log("%c%s", "color:red","el : " + this.$el);
console.log(this.$el);
console.log("%c%s", "color:red","data : " + this.$data);
console.log("%c%s", "color:red","message: " + this.msg);
},
beforeDestroy(){ //销毁前状态
console.group('------beforeDestroy 销毁前状态------');
console.log("%c%s", "color:red","el : " + this.$el);
console.log(this.$el);
console.log("%c%s", "color:red","data : " + this.$data);
console.log("%c%s", "color:red","message: " + this.msg);
},
destroyed(){ //销毁完成状态
console.group('------destroyed 组件销毁完成状态------');
console.log("%c%s", "color:red","el : " + this.$el);
console.log(this.$el);
console.log("%c%s", "color:red","data : " + this.$data);
console.log("%c%s", "color:red","message: " + this.msg)
}
});
}
</script>
</head>
<body>
<div id="app">
<input type="text" v-model="msg" />
<button @click="update">更新数据</button>
<button @click="destroy">销毁组件</button>
</div>
</body>
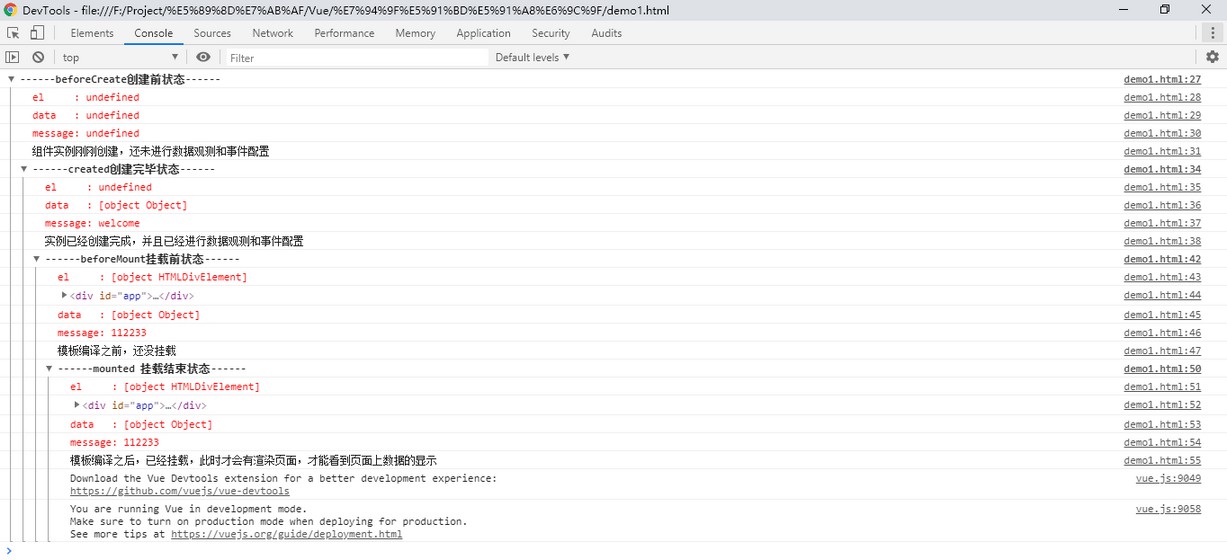
</html>在控制台的console里面查看运行后的效果:
然后点击“更新数据”按钮,会看到input绑定的数据发生变化:
数据更新前:

数据更新后:

控制台显示的打印信息:

最后点击“销毁组件”按钮,查看控制台显示的打印信息:

这样,一个完整的Vue实例生命周期就结束了。
注意:Vue组件被销毁以后,这时如果在更新数据就不会有任何反应了,因为组件已经被销毁
到此这篇关于Vue生命周期的文章就介绍到这了。希望对大家的学习有所帮助,也希望大家多多支持。
加载全部内容