SpringBoot 框架整合
一只小熊猫呀 人气:0本章概要
- 启动系统任务
- 整合 Servlet、Filter 和 Listener
- 路径映射
启动系统任务
有一些特殊的任务需要在系统启动时执行,例如配置文件加载,数据库初始化等操作。如果没有使用 Spring Boot ,这些问题可以在 Listener 中解决。Spring Boot 对此提供了两种解决方案 CommandLineRunner 和 ApplicationRunner。两者基本一致,差别主要体现在参数上。
CommandLineRunner
Spring Boot 项目在启动时会遍历所有 CommandLineRunner 的实现类并调用其中的 run 方法,如果整个系统中有多个 CommandLineRunner 的实现类,那么可以使用 @Oder 注解对这些实现类的调用顺序进行排序。
在一个 Spring Boot Web 项目中(Spring Boot 项目引入 Web 依赖)添加两个 CommandLineRunner,分别如下:
@Component
@Order(1)
public class MyCommandLineRunner1 implements CommandLineRunner {
    @Override
    public void run(String... args) throws Exception {
        System.out.println("Runner1>>>"+ Arrays.toString(args));
    }
}
@Component
@Order(2)
public class MyCommandLineRunner2 implements CommandLineRunner {
    @Override
    public void run(String... args) throws Exception {
        System.out.println("Runner2>>>"+Arrays.toString(args));
    }
}
代码解释:
- @Order(1) 注解用来描述 CommandLineRunner 的执行顺序,数字越小越先执行。
- run 方法中是调用的核心逻辑,参数是系统启动时传入的参数,即入口类中 main 方法的参数(在调用 SpringApplication.run 方法时被传入 Spring Boot 项目中)
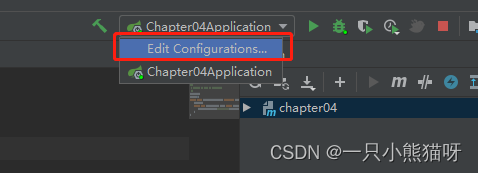
在系统启动时,配置传入的参数,以 IDEA 为例,配置方式如下:
步骤01:单击右上角的编辑启动配置,如图:
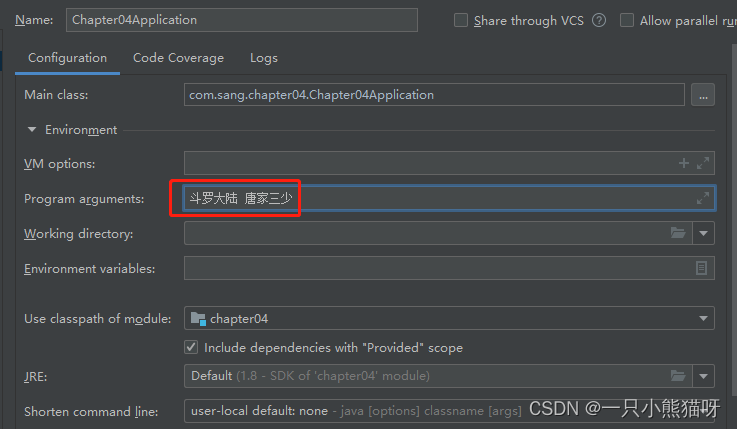
步骤02:在打开的新页面中编辑 Program arguments:
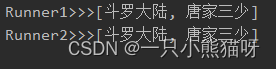
启动项目,启动日志如图:
ApplicationRunner
在一个Spring Boot Web 项目中信件两个 ApplicationRunner,代码如下:
@Component
@Order(2)
public class MyApplicationRunner1 implements ApplicationRunner {
    @Override
    public void run(ApplicationArguments args) throws Exception {
        List<String> nonOptionArgs = args.getNonOptionArgs();
        System.out.println("1-nonOptionArgs>>>" + nonOptionArgs);
        Set<String> optionNames = args.getOptionNames();
        for (String optionName : optionNames) {
            System.out.println("1-key:" + optionName + ";value:" +
                    args.getOptionValues(optionName));
        }
    }
}
@Component
@Order(1)
public class MyApplicationRunner2 implements ApplicationRunner {
    @Override
    public void run(ApplicationArguments args) throws Exception {
        List<String> nonOptionArgs = args.getNonOptionArgs();
        System.out.println("2-nonOptionArgs>>>" + nonOptionArgs);
        Set<String> optionNames = args.getOptionNames();
        for (String optionName : optionNames) {
            System.out.println("2-key:" + optionName + ";value:" +
                    args.getOptionValues(optionName));
        }
    }
}
代码解释:
- @Order 注解依然是用来描述执行顺序的,数字越小越优先执行
- @不同于 CommandLineRunner 中的 run 方法的 String 数组参数,这里 run 方法的参数是一个 ApplicationArguments 对象,如果想从 ApplicationArguments 对象中获取入口类中的 main 方法接收的参数,调用 ApplicationArguments 中的 getNonOptionArgs 方法即可。ApplicationArguments 中的getOptionNames方法用来获取项目启动命令中参数的 key ,例如将本项目打成 jar 包,运行 java -jar xxx.jar -name=Michael 命令来启动项目,此时 getOptionNames方法获取到的就是 name ,而 getOptionValues 方法则是获取相应的 value。
打包程序,执行如下命令启动项目:
java -jar chapter04-0.0.1-SNAPSHOT.jar --name=Michael --age=99 斗罗大陆 唐家三少
日志如下:

整合Servlet与Filter和Listener
一般情况下,使用Spring 、 Spring MVC 这些框架后,基本上就告别 Servlet、Filter 、 Listerer 了,但是有时在整合一些第三方框架时,可能还是不得不使用 Servlet ,比如在整合某报表插件时就需要使用 Servlet。Spring Boot 中对于整合这些基本的 Web 组件也提供了很好的支持。
在一个 Spring Boot Web 项目中添加如下三个组件:
@WebServlet("/my")
public class MyServlet extends HttpServlet {
    @Override
    protected void doGet(HttpServletRequest req, HttpServletResponse resp){
        doPost(req,resp);
    }
    @Override
    protected void doPost(HttpServletRequest req, HttpServletResponse resp){
        System.out.println("name>>>"+req.getParameter("name"));
    }
}
@WebFilter("/*")
public class MyFilter implements Filter {
    @Override
    public void init(FilterConfig filterConfig){
        System.out.println("MyFilter>>>init");
    }
    @Override
    public void doFilter(ServletRequest request, ServletResponse response, FilterChain chain) throws IOException, ServletException {
        System.out.println("MyFilter>>>doFilter");
        chain.doFilter(request,response);
    }
    @Override
    public void destroy() {
        System.out.println("MyFilter>>>destroy");
    }
}
@WebListener
public class MyListener implements ServletRequestListener {
    @Override
    public void requestDestroyed(ServletRequestEvent sre) {
        System.out.println("MyListener>>>requestDestroyed");
    }
    @Override
    public void requestInitialized(ServletRequestEvent sre) {
        System.out.println("MyListener>>>requestInitialized");
    }
}
代码解释:
- 定义了三个基本的组件,分别使用 @WebServlet 、@WebFilter、@WebListener 三个注解进行标记
- 这里以 ServletRequestListener 为例,但是对于其他的 Listener ,例如 HttpSessionListener、ServletContextListener 等也是支持的
在项目入口类上添加 @ServletComponentScan 注解,实现对 Servlet、Filter 、Listener 的扫码,如下:
@SpringBootApplication
@ServletComponentScan
public class Chapter04Application {
    public static void main(String[] args) {
        SpringApplication.run(Chapter04Application.class, args);
    }
}
最后启动项目,浏览器输入"http://localhost:8081/my?name=Michael",可以看到相关日志,如下:MyListener>>>requestInitialized
MyFilter>>>doFilter
name>>>Michael
MyListener>>>requestDestroyed
路径映射
一般情况下,使用了页面模板后,用户需要通过控制器才能访问页面。有一些页面需要在控制器中加载数据,然后渲染才能显示出来;还有一些页面在控制器中不需要加载数据,只是完成简单的跳转,对于这种页面,可以直接配置路径映射。例如,有两个 Thymeleaf 做模板的页面 login.html 和 index.html ,直接在 addViewControllers 方法配置映射关系即可:
@Configuration
public class WebMvcConfig implements WebMvcConfigurer {
    @Override
    public void addViewControllers(ViewControllerRegistry registry){
        registry.addViewController("/login").setViewName("login");
        registry.addViewController("/index").setViewName("index");
    }
}
加载全部内容