springboot自定义starter
索码理 人气:1SpringBoot starter
用了springboot 那么久了居然都还没自定义过starter,想想都觉得羞愧,所以今天来玩一下。
SpringBoot中的starter是一种非常重要的机制,能够抛弃以前繁杂的配置,将其统一集成进starter,应用者只需要在maven中引入starter依赖,SpringBoot就能自动扫描到要加载的信息并启动相应的默认配置。starter让我们摆脱了各种依赖库的处理,需要配置各种信息的困扰。
SpringBoot会自动通过classpath路径下的类发现需要的Bean,并注册进IOC容器。SpringBoot提供了针对日常企业应用研发各种场景的spring-boot-starter依赖模块。所有这些依赖模块都遵循着约定成俗的默认配置,并允许我们调整这些配置,即遵循“约定大于配置”的理念。
自定义starter
日常工作中有时有一些独立于业务之外的功能或模块,可能这个项目在用,另一个项目也要用,如果每次都重新集成的话就会很麻烦,这时我们只要把这些功能或模块封装成一个个starter的话,在使用的时候引入进去就很方便了。
自定义starter步骤
其实自定义starter很简单,大致需要以下5步:
- 新建两个模块,命名规范: springboot自带的starter命名规范为spring-boot-starter-xxx, 自定义的starter命名规范为xxx-spring-boot-starter
xxx-spring-boot-autoconfigure:自动配置核心代码
xxx-spring-boot-starter:管理依赖
如果不需要将自动配置代码和依赖项管理分离开来,则可以将它们组合到一个模块中。只不过springboot
官方建议将两个模块分开。
- 2. 引入spring-boot-autoconfigure依赖
- 3. 创建自定义的XXXProperties 类: 这个类的属性根据需要是要出现在配置文件中的。
- 4. 创建自定义的XXXAutoConfiguration类:这个类要配置自动配置时的一些逻辑,同时也要让XXXProperties 类生效。
- 5. 创建自定义的spring.factories文件:在resources/META-INF创建一个spring.factories文件和spring-configuration-metadata.json,spring-configuration-metadata.json文件是用于在填写配置文件时的智能提示,可要可不要,有的话提示起来更友好。spring.factories用于导入自动配置类,必须要有
实现
我这里为了方便就只创建一个模块了,
- 创建一个模块,命名为spring-boot-starter-myStarter,对应pom文件
	<groupId>com.example</groupId>
	<artifactId>spring-boot-starter-myStarter</artifactId>
	<version>1.0</version>
	<name>my-starter</name>
- 引入spring-boot-autoconfigure依赖 我这里使用的spring-boot-autoconfigure版本是2.6.2
	<dependencies>
		<dependency>
			<groupId>org.springframework.boot</groupId>
			<artifactId>spring-boot-autoconfigure</artifactId>
			<version>2.6.2</version>
		</dependency>
	</dependencies>
- 创建自定义的XXXProperties 类
@ConfigurationProperties(prefix = "com.arron")
public class MyStarterProperties {
    private String name;
    public String getName() {
        return name;
    }
    public void setName(String name) {
        this.name = name;
    }
}
再创建一个MyStarterConfig用于读取MyStarterProperties 里的属性
public class MyStarterConfig {
    private MyStarterProperties myStarterProperties;
    private String name;
    public MyStarterConfig(MyStarterProperties myStarterProperties) {
        this.myStarterProperties = myStarterProperties;
    }
    public String getName() {
        return myStarterProperties.getName();
    }
    public void setName(String name) {
        this.name = name;
    }
}
- 创建自定义的XXXAutoConfiguration类
@Configuration
// EnableConfigurationProperties value数组中的配置类起作用
@EnableConfigurationProperties(value = {MyStarterProperties.class})
public class MyStarterAutoConfiguration {
    @Autowired
    private MyStarterProperties myStarterProperties;
    @Bean
    @ConditionalOnMissingBean(MyStarterConfig.class)
    public MyStarterConfig myStarterConfig(){
        return new MyStarterConfig(myStarterProperties);
    }
}
- 在resources/META-INF创建一个spring.factories文件
spring.factories
org.springframework.boot.autoconfigure.EnableAutoConfiguration=com.example.myStarter.MyStarterAutoConfiguration
spring-configuration-metadata.json
{
  "group": [
    {
      "name": "com.arron",
      "type": "com.example.myStarter.MyStarterProperties",
      "sourceType": "com.example.myStarter.MyStarterProperties"
    }
  ],
  "properties": [
    {
      "name": "com.arron.name",
      "type": "java.lang.String",
      "description": "my start name",
      "sourceType": "com.example.myStarter.MyStarterProperties",
      "defaultValue": "MyStarterProperties name"
    }
  ]
}
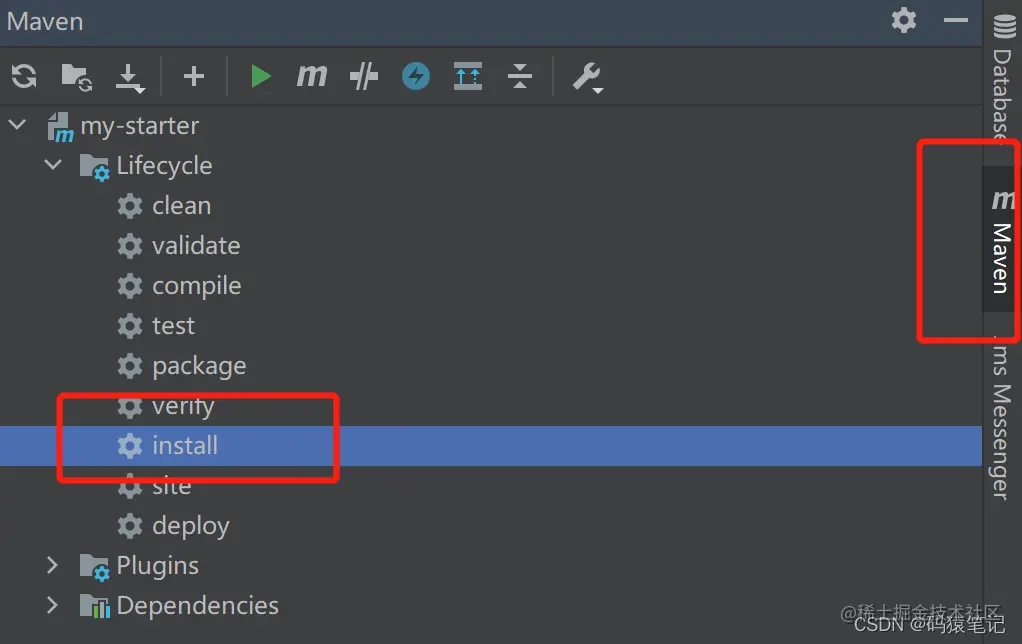
打包测试
找到如图maven,点击install,安装到本地
然后新建一个项目导包进行测试,创建项目过程就不介绍了。
- 引入依赖
	<dependency>
       <groupId>com.example</groupId>
       <artifactId>spring-boot-starter-myStarter</artifactId>
       <version>1.0</version>
   </dependency>
- 配置文件添加属性:
com:
  arron:
    name: myname
- 单元测试:
@RunWith(SpringRunner.class)
@SpringBootTest
class RabbitmqApplicationTests {
    @Autowired
    private MyStarterConfig myStarterConfig;
    @Test
    public void testMyStarter(){
        String name = myStarterConfig.getName();
        System.out.println(name);
    }
}
控制台输出:
myname
至此,一个简单自定义的springboot starter就完成了。
注解解释
下面这些注解在自定义starter是可能会用到。
- @Conditional:按照一定的条件进行判断,满足条件给容器注册bean
- @ConditionalOnMissingBean:给定的在bean不存在时,则实例化当前Bean
- @ConditionalOnProperty:配置文件中满足定义的属性则创建bean,否则不创建
- @ConditionalOnBean:给定的在bean存在时,则实例化当前Bean
- @ConditionalOnClass: 当给定的类名在类路径上存在,则实例化当前Bean
- @ConditionalOnMissingClass :当给定的类名在类路径上不存在,则实例化当前Bean
加载全部内容