Vue hash改为history
半开半落 人气:0把hash模式改为history模式

如上图所示非常简单
只需要在文件router下的index.js里加上一个mode:'history’即可把hash模式改为history模式.这个时候url上面的#号就不会再存在了,这样就把url成功把hash模式改成history了
关于路由hash和history模式
hash模式
hash 就是指 url 后的 # 号以及后面的字符,
比如,http://127.0.0.1:5500/test.html#/user,这里的hash值就是#/user。
hash 值的变化不会导致浏览器像服务器发送请求
hash 的改变会触发 hashChange 事件,浏览器的前进后退也能对其进行控制
<!DOCTYPE html>
<html lang="en">
<head>
  <meta charset="UTF-8">
  <meta http-equiv="X-UA-Compatible" content="IE=edge">
  <meta name="viewport" content="width=device-width, initial-scale=1.0">
  <title>hash模式的实现</title>
</head>
<body>
  <button id="myBtn">改变hash的值</button>
  <script>
    const myBtn = document.getElementById('myBtn');
      // 通过 onhashchange 监听hash值变化
    window.onhashchange = (e) => {
      console.log('老URL',e.oldURL);
      console.log('新URL',e.newURL);
      console.log('hash',location.hash);
    }
  </script>
</body>
</html>
上面是通过 on 来监听事件,其实也可以用
window.addEventListener("hashchange", funcRef, false);改变hash的三种方式:
第一种:手动在导航栏中修改

控制台的输出
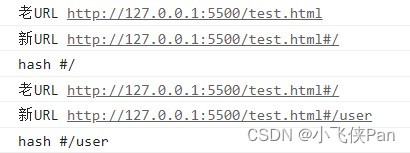
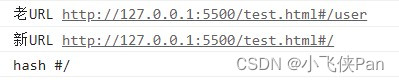
第二种方式:手动点击前进后退按钮
这里是点击了后退按钮,从 #/user 后退到了 #/
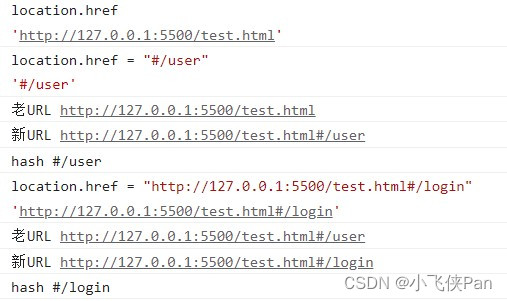
第三种方式:通过js代码修改
给按钮增加监听函数,当点击按钮时,进行路由改变。
  <script>
    const myBtn = document.getElementById('myBtn');
    window.onhashchange = (e) => {
      console.log('老URL',e.oldURL);
      console.log('新URL',e.newURL);
      console.log('hash',location.hash);
    }
    // 增加监听函数
    myBtn.addEventListener('click',() => {
      location.href = '#/user';
    })
  </script>
起初,路由位于http://127.0.0.1:5500/test.html#/,
然后点击按钮

注:Location对象用于表示window上当前链接到的URL信息。
href: 当前window对应的超链接URL, 整个URL;hash: 哈希值;pathname:访问页面;
用一个网址来演示location的属性
//http://127.0.0.1:8001/01-hash.html?a=100&b=20#/aaa/bbb
location.protocal // 'http:'
localtion.hostname // '127.0.0.1'
location.host // '127.0.0.1:8001'
location.port //8001
location.pathname //'01-hash.html'
location.serach // '?a=100&b=20'
location.hash // '#/aaa/bbb'
对于href属性
history 模式
默认情况下, 路径的改变使用的URL的hash.
如果使用history模式,在配置路由规则时,加入"mode: ‘history’".
//main.js文件中
const router = new VueRouter({
  mode: 'history',
  routes: [...]
})
history 模式,每访问一个页面都要发起网络请求,每个请求都需要服务器进行路由匹配、数据库查询、生成HTML文档后再发送响应给浏览器,这个过程会消耗服务器的大量资源,给服务器的压力较大。
<!DOCTYPE html>
<html lang="en">
<head>
<meta charset="UTF-8">
<meta http-equiv="X-UA-Compatible" content="IE=edge">
<meta name="viewport" content="width=device-width, initial-scale=1.0">
<title>history模式的实现</title>
</head>
<body>
<button id="myBtn">改变hash的值</button>
<script>
const myBtn = document.getElementById('myBtn');
window.addEventListener('DOMContentLoaded',() => {
//页面DOM加载完毕后打印出页面的路径
console.log('path: ',location.pathname);
})
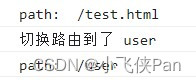
myBtn.addEventListener('click',() => {
const state = {name:'user'};
history.pushState(state, '', 'user');
console.log('切换路由到了','user');
console.log('path: ',location.pathname);
})
</script>
</body>
</html>起初路由位于http://127.0.0.1:5500/test.html,
当点击了按钮之后,路由变成了http://127.0.0.1:5500/user。
history 模式
利用了 HTML5 History Interface 中新增的 pushState() 和 replaceState() 方法。
history.pushState();         // 添加新的状态到历史状态栈
history.replaceState();      // 用新的状态代替当前状态
history.state                // 返回当前状态对象
history.pushState()在保留现有历史记录的同时,将 url 加入到历史记录中。history.replaceState()会将历史记录中的当前页面历史替换为 url。
由于 history.pushState() 和 history.replaceState() 可以改变 url 同时,不会刷新页面,所以在 HTML5 中的 histroy 具备了实现前端路由的能力。
这两个方法有个共同的特点:当调用他们修改浏览器历史记录栈后,虽然当前 URL 改变了,但浏览器不会刷新页面,这就为单页应用前端路由“更新视图但不重新请求页面”提供了基础。
history
在修改 url 后,虽然页面并不会刷新,但我们在手动刷新,或通过 url 直接进入应用的时候, 服务端是无法识别这个 url 的,会报 404 问题。
因为我们是单页应用,只有一个 html 文件,服务端在处理其他路径的 url 的时候,就会出现404的情况。 所以,如果要应用 history 模式,需要在服务端增加一个覆盖所有情况的候选资源:如果 URL 匹配不到任何静态资源,则应该返回单页应用的 html 文件。
popstate
在history模式中与hash模式的hashchange对应的是popState。
popstate是在浏览器回退前进或者js的 back() go() forward()方法的时候才会触发。
    //监听 popstate 事件
    window.onpopstate = (e) => {
      console.log('onpopstate', e.state, location.pathname);
    }
二者对比
1.从兼容角度分析。
hash 可以兼容到 IE8,history 只能兼容到 IE10。
2.从网络请求的角度分析。
使用 hash 模式,地址改变时通过 hashchange 事件,只会读取哈希符号后的内容,并不会发起任何网络请求。
history 模式,每访问一个页面都要发起网络请求,每个请求都需要服务器进行路由匹配、数据库查询、生成HTML文档后再发送响应给浏览器,这个过程会消耗服务器的大量资源,给服务器的压力较大。
3.服务器配置角度分析。
hash 不需要服务器任何配置。
history 进行刷新页面时,无法找到url对应的页面,会出现 404 问题。如果要应用 history 模式,需要在服务端增加一个覆盖所有情况的候选资源:如果 URL 匹配不到任何静态资源,则应该返回单页应用的 html 文件。
以上为个人经验,希望能给大家一个参考,也希望大家多多支持。
加载全部内容