iOS 抖音点赞
iOS南方 人气:0前言
很多人肯定都是玩过抖音的吧,那也肯定为了某位美女或者帅哥偷偷作死的点过小爱心。但是你肯定不知道怎么实现的吧,今天我来教你一手,仔细看。
本篇文章主要包含技术点:
- CAShapeLayer和贝赛尔曲线绘制三角形
- 组合动画的时间技巧
实现原理
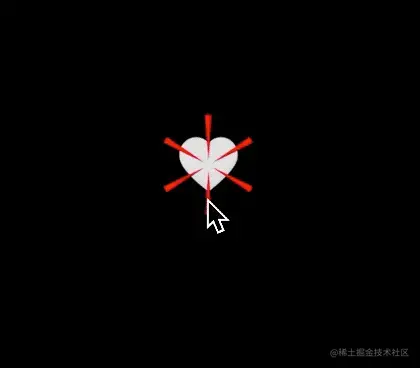
首先 我们来详细分解一下这个动画
请仔细观察
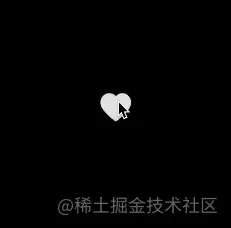
我们来看单独的一个动画
请仔细观看 我设置10秒的duration 以便于大家能看清楚
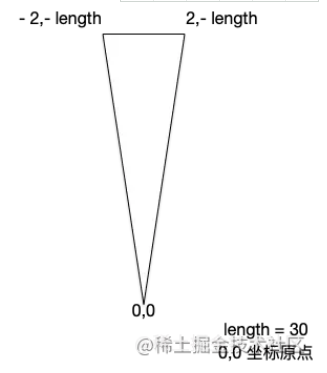
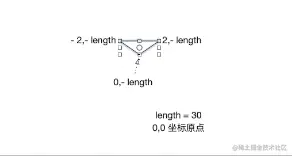
三角形的贝塞尔曲线原理
从上述两张图中,我们可以看到 它是一个 三角形的贝塞尔曲线
这样的动画需要经过:
- 2π (360°)旋转一周
- 圆一周一共有六个 三角形的贝赛尔曲线图形形状.
- 一个动画组 内部包含缩放动画 从0~1的放大 ,动画如果执行10秒,那么 scale缩放动画执行 10*0.2 = 2秒, 动画组中还包含另一个动画是 从结束位置的动画到结尾消失的位置大小变化直到动画消失.
- 沿着圆形每 60°角度 创建一个上图的三角形图形.
说了这么多 实际就是用CABasicAnimation的keypath是path和CABasicAnimation的keypath是transform.scale的动画组合在一起作用于一个三角形上,并且一共创建6个三角形图形.
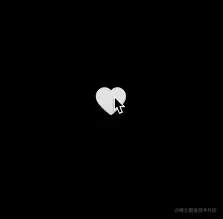
结束的时候大概是这样的
结束的时候实际上是一个从 上一次动画执行完成的path向 一条线上三个点的path过渡的过程,直到最后隐藏消失.
好下面我们来实现一下这个动画
注意: 背景的❤️红心是 一张图不在本篇讲述范围
代码实现
首先我们子类话一个ZanLikeView继承自UIView并设置底部的图片和点击变换的❤️图片,就是两张UIImageView加手势,当点击的时候区分不同view的tag就知道哪个imageview点击,这样就可以做两张动画不同的效果了,不过这些可以参考demo.
我主要介绍核心代码
创建 CAShapeLayer
创建 CAShapeLayer用于做形状图形相关的图形动画.
CAShapeLayer *layer = [[CAShapeLayer alloc]init];
layer.position = _likeBefore.center;
layer.fillColor = [UIColor redColor].CGColor;
颜色最终可对外暴露接口
for循环每 30°角创建一个上述的三角形.我们需要创建 6个 就循环6次
创建初始位置的贝塞尔path
CGFloat length = 30;
CGFloat duration = 0.5f;
for(int i = 0 ; i < 6; i++) {
    CAShapeLayer *layer = [[CAShapeLayer alloc]init];
    layer.position = _likeBefore.center;
    layer.fillColor = [[UIColor redColor].CGColor;
    //...  1
    //...  2
    //...  3
}
这里我们一共创建6个shapeLayer的实例并填充成颜色,我们这里填充的是红色 其它的颜色可自行封装.
_likeBefore 是我们看到白色的❤️背景视图(UIImageView)
下面 在//... 1的地方加入如下代码
UIBezierPath *startPath = [UIBezierPath bezierPath];
[startPath moveToPoint:CGPointMake(-2, -length)];
[startPath addLineToPoint:CGPointMake(2, -length)];
[startPath addLineToPoint:CGPointMake(0, 0)];
然后创建完成我们需要把path给layer.path. 记得转成CGPath
layer.path = startPath.CGPath;
layer.transform = CATransform3DMakeRotation(M_PI / 3.0f * i, 0.0, 0.0, 1.0);
[self.layer addSublayer:layer]
注: CATransform3DMakeRotation()函数 当x,y,z值为0时,代表在该轴方向上不进行旋转,当值为-1时,代表在该轴方向上进行逆时针旋转,当值为1时,代表在该轴方向上进行顺时针旋转
因为我们是需要60°创建一个layer所以需要顺时针 M_PI / 3.0f = 60°. 每循环一次则创建第N个角度乘60°.
接着在//... 2添加如下代码
//动画组
CAAnimationGroup *group = [[CAAnimationGroup alloc] init];
group.removedOnCompletion = NO;
group.timingFunction = [CAMediaTimingFunction functionWithName:kCAMediaTimingFunctionEaseInEaseOut];
group.fillMode = kCAFillModeForwards;
group.duration = duration;
//缩放动画
CABasicAnimation *scaleAnim = [CABasicAnimation animationWithKeyPath:@"transform.scale"];
scaleAnim.fromValue = @(0.0);
scaleAnim.toValue = @(1.0);
scaleAnim.duration = duration * 0.2f; //注意这里是在给定时长的地方前0.2f的时间里执行缩放
这里说下duration *0.2f. 比如我给定 10秒的duration,那么 duration *0.2 = 2 秒执行缩放.
最后在//... 3的代码出加上如下代码
//结束点
UIBezierPath *endPath = [UIBezierPath bezierPath];
[endPath moveToPoint:CGPointMake(-2, -length)];
[endPath addLineToPoint:CGPointMake(2, -length)];
[endPath addLineToPoint:CGPointMake(0, -length)];
CABasicAnimation *pathAnim = [CABasicAnimation animationWithKeyPath:@"path"];
pathAnim.fromValue = (__bridge id)layer.path;
pathAnim.toValue = (__bridge id)endPath.CGPath;
pathAnim.beginTime = duration * 0.2f;
pathAnim.duration = duration * 0.8f;
[group setAnimations:@[scaleAnim, pathAnim]];
[layer addAnimation:group forKey:nil];
这几行代码的意识是 从我们上一个layer的path位置开始向我们结束位置的path过渡,并且注意开始时间pathAnim.beginTime是 duration *0.2也就是说 在上一个动画结束的时间点才开始结束过渡,过渡的时长剩余是duration *0.8.这样两个连贯在一起的动画就执行完了,最后把动画加到动画组 天加给layer.
剩余的工作就是做个普通的动画的 基本没什么了.
[UIView animateWithDuration:0.35f
                      delay:0.0f
                    options:UIViewAnimationOptionCurveEaseIn
                 animations:^{
                     self.likeAfter.transform = CGAffineTransformScale(CGAffineTransformMakeRotation(-M_PI_4), 0.1f, 0.1f);
                 }
                 completion:^(BOOL finished) {
                     [self.likeAfter setHidden:YES];
                     self.likeBefore.userInteractionEnabled = YES;
                     self.likeAfter.userInteractionEnabled = YES;
                 }];
结束
结束动画的开始时间和结束时间控制,恰到好处,以上就是iOS实现抖音点赞功能的详细内容,更多关于iOS 抖音点赞的资料请关注其它相关文章!
加载全部内容