java飞机大战
classic123 人气:0飞机大战详细文档
文末有源代码,以及本游戏使用的所有素材,将plane2文件复制在src文件下可以直接运行。
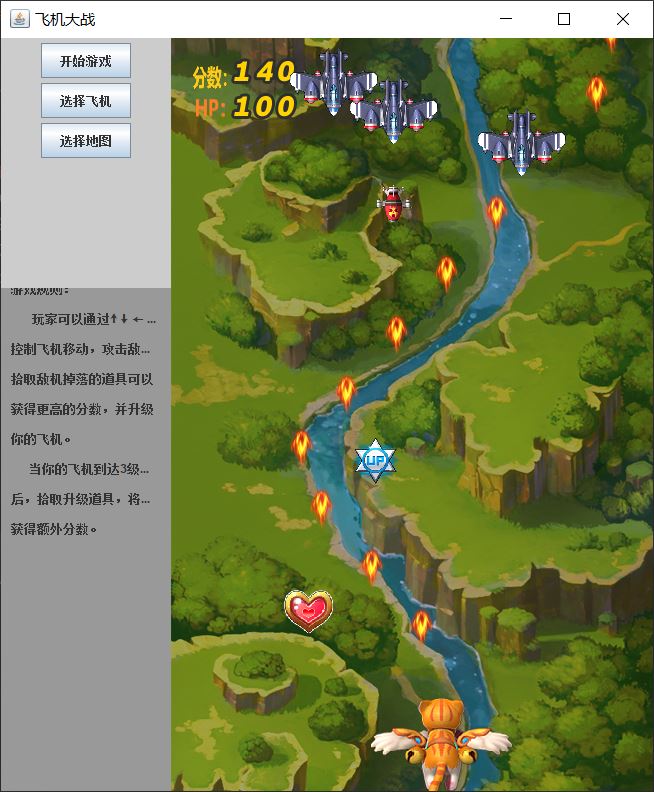
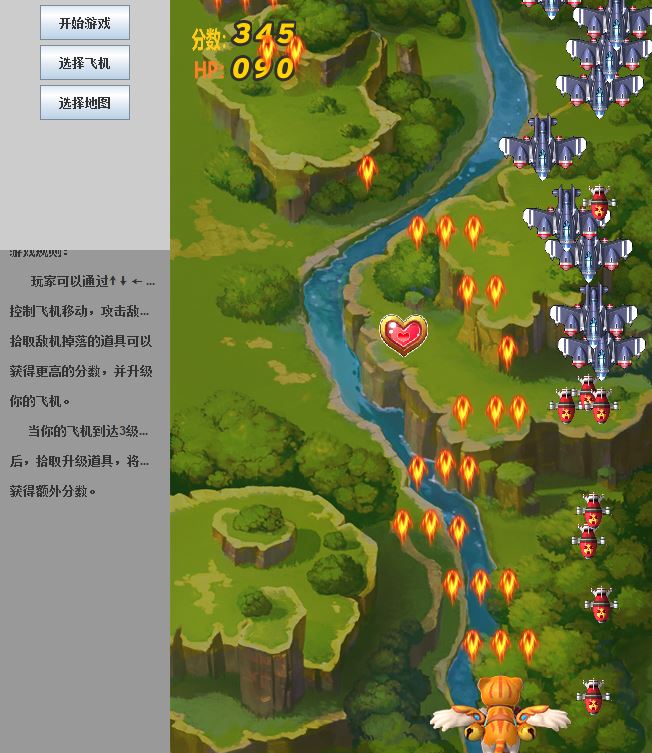
实现效果:
结构设计
- 角色设计
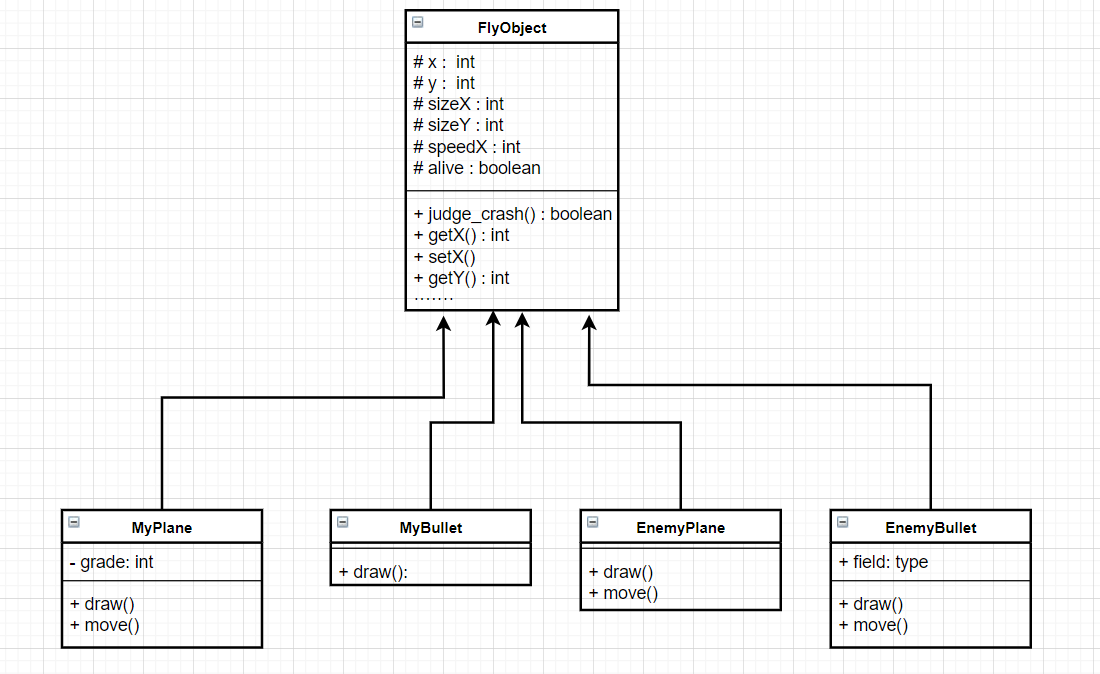
- 飞行对象类 FlyObject
- 战机类
- 我的飞机 MyPlane
- 敌方飞机 EnemyPlane
- 子弹类
- 我的子弹 MyBullet
- 敌方子弹 EnemyBullet
- 道具类 Prop
- 加分,加血,升级
- 战机类
- 地图背景类 Background
- 玩家类 Player
- HP,得分
- 飞行对象类 FlyObject
- 线程类
- 绘制线程 DrawThread
- 移动线程 MoveThread
- 生成敌方飞机线程 EnemyPlaneThread
- 敌方飞机生成子弹线程 EnemyButtleThread
- 检测碰撞线程 TestCrashThread
- 界面类
- 主界面 GameUI
- 选择地图界面 SelectMapUI
- 监听器类 KListener
- 通过按压键盘改变我方飞机的速度
- 数据结构
- 我方战机(只有一个)
- 我方飞机子弹集合
- 敌方飞机集合
- 敌方子弹集合
- 道具集合
详细分析
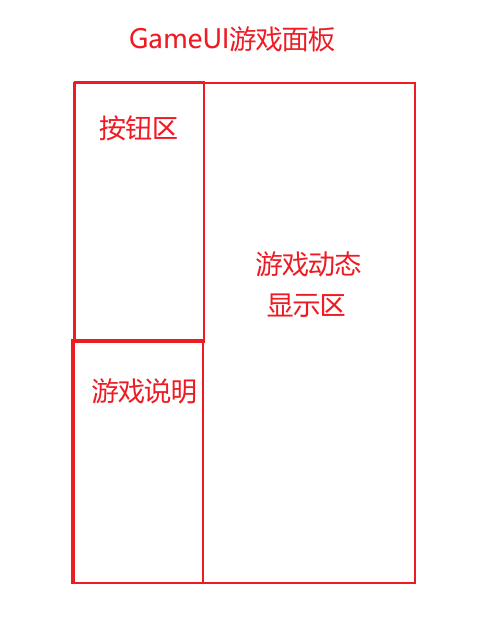
Main界面类使用边框布局,给面板分三个区,如图所示
关键代码:
  JFrame jf = new JFrame("飞机大战"); //创建窗体
        jf.setSize(670,800);
        jf.setLocationRelativeTo(null);
        jf.setDefaultCloseOperation(WindowConstants.EXIT_ON_CLOSE);
        jf.setLayout(new BorderLayout()); //布局

        //创建三个JPanel,左上为按钮,左下为分数显示 右为游戏页面
        JPanel left = new JPanel();
        JPanel leftUp = new JPanel();  //左上
        JPanel leftDown = new JPanel();   //左下
        game = new JPanel();   //游戏显示区

        left.setPreferredSize(new Dimension(170,800));
        left.setBackground(new Color(-3355444));
        jf.add(left,BorderLayout.WEST);

        jf.add(game,BorderLayout.CENTER);
        game.requestFocus();
        left.setLayout(new BorderLayout());

        leftUp.setPreferredSize(new Dimension(0,250));
        leftUp.setBackground(new Color(-3355444));
        left.add(leftUp,BorderLayout.NORTH);

        leftDown.setBackground(new Color(-6710887));
        leftDown.setPreferredSize(new Dimension(0,550));
        left.add(leftDown,BorderLayout.SOUTH);
绘制背景地图
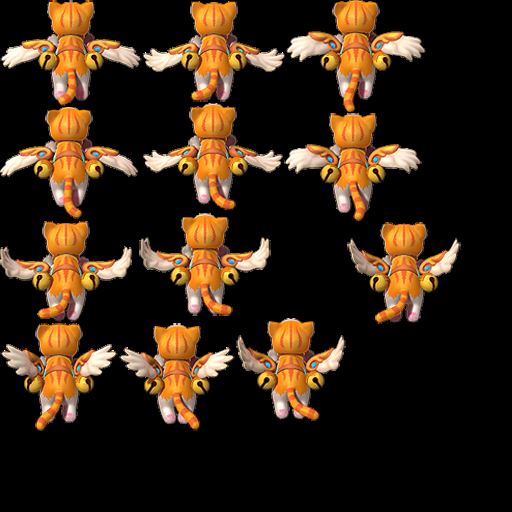
飞行道具类UML图
判断FlyObject对象是否碰撞
public boolean judge_crash(FlyObject fo){
        if(x+sizeX<fo.x || y+sizeY<fo.y || x > fo.x + fo.sizeX || y > fo.y+ fo.sizeY ){
            return false;
        }else{
            return true;
        }
    }
绘制线程: 如何让我们的游戏动起来
- 视频原理:我们在屏幕上看见的动态图像图像实际上由若干个静止图像构成,由于人眼有暂留特性,刚显示的图像在大脑中停留一段时间,若静态图像每
- 秒钟变化25幅,那么人的感觉屏幕上的图像是动的。
- 绘制时要把所有的飞行物都绘制一遍,所以我们需要在每一个飞行物被创建时,添加到相关的飞行物集合中。(为了方便传值,我们将集合设为静态变量)
- 我们的绘制线程,选择每30ms绘制一次,注意先画背景,然后再遍历飞行物集合画飞行物。
背景的绘制
要想绘制动态的背景,首先我们要先画一张静态的背景图,那么如何绘制一张静态的背景图呢?
获取包中的图片:
  String fileName_0 = "src\\plane2\\z_img\\img_bg_0.jpg"; //相对地址(和绝对地址区分开)
        BufferedImage bufferedImage;
        bufferedImage = ImageIO.read(new File(fileName_0));  //将文件读出记录在bufferedImage中,记得抛出异常
        g.drawImage(bufferedImage,0,0,null);   // 将bufferedImage中的内容画在画笔g对应的地方
我们的地图是一张可以从上往下无缝滚动的图片,就像是这样的图

接下来,如何让画出连续的图片呢?
在绘制函数中,有一个函数可以完美实现我们的需求
img – the specified image to be drawn. This method does nothing if img is null.
        dx1 – the x coordinate of the first corner of the destination rectangle.
        dy1 – the y coordinate of the first corner of the destination rectangle.
        dx2 – the x coordinate of the second corner of the destination rectangle.
        dy2 – the y coordinate of the second corner of the destination rectangle.
        sx1 – the x coordinate of the first corner of the source rectangle.
        sy1 – the y coordinate of the first corner of the source rectangle.
        sx2 – the x coordinate of the second corner of the source rectangle.
        sy2 – the y coordinate of the second corner of the source rectangle.
        observer – object to be notified as more of the image is scaled and converted.
    public abstract boolean drawImage(Image img,
                                      int dx1, int dy1, int dx2, int dy2,
                                      int sx1, int sy1, int sx2, int sy2,
                                      ImageObserver observer);
比如说,我们的图片高度为712个像素点,我们在下一时刻,图片向下移动了m个像素点,那么我们就将这张图片的0 ~ 712-m 部分,绘制到游戏界面的m ~ 712部分,
再将712-m ~ 712 部分绘制到游戏界面的0 ~ m 部分;
接下来,我们就要确定 m 的值,这个就很简单了,在绘制线程中,定义一个整数变量m ,每次绘制完 m++ 就可以了。(个人建议m+=2比较舒服)
/**
* @author liTianLu
* @Date 2022/5/21 23:33
* @purpose 绘制背景
 * 提醒: 这里我写了四种地图的绘制,后面在选择地图时会用到。
*/
public class BackGround {
    Graphics g;
    BufferedImage bufferedImage_1;
    BufferedImage bufferedImage_2;
    BufferedImage bufferedImage_3;
    BufferedImage bufferedImage_4;
    int w;
    int h;
    String fileName_1 = "src\\plane2\\z_img\\img_bg_1.jpg";   //地图1
    String fileName_2 = "src\\plane2\\z_img\\img_bg_2.jpg";   //地图2
    String fileName_3 = "src\\plane2\\z_img\\img_bg_3.jpg";   //地图3
    String fileName_4 = "src\\plane2\\z_img\\img_bg_4.jpg";   //地图4
    public BackGround(Graphics g) throws IOException {
        this.g = g;
        bufferedImage_1 = ImageIO.read(new File(fileName_1));
        bufferedImage_2 = ImageIO.read(new File(fileName_2));
        bufferedImage_3 = ImageIO.read(new File(fileName_3));
        bufferedImage_4 = ImageIO.read(new File(fileName_4));
        w = bufferedImage_1.getWidth();
        h = bufferedImage_1.getHeight();
    }
    /**
    * i : 向下移动了i个像素
    * num : 用来控制绘制哪一个地图
    */
    public void draw(int i , int num){
        switch(num){
            case 1 :
                g.drawImage(bufferedImage_1,0,i,w,i+h,0,0,w,h,null);
                g.drawImage(bufferedImage_1,0,0,w,i,0,h-i,w,h,null);
                break;
            case 2 :
                g.drawImage(bufferedImage_2,0,i,w,i+h,0,0,w,h,null);
                g.drawImage(bufferedImage_2,0,0,w,i,0,h-i,w,h,null);
                break;
            case 3 :
                g.drawImage(bufferedImage_3,0,i,w,i+h,0,0,w,h,null);
                g.drawImage(bufferedImage_3,0,0,w,i,0,h-i,w,h,null);
                break;
            case 4 :
                g.drawImage(bufferedImage_4,0,i,w,i+h,0,0,w,h,null);
                g.drawImage(bufferedImage_4,0,0,w,i,0,h-i,w,h,null);
                break;
        }
    }
    public int getH() {
        return h;
    }
}
绘制线程:
backGround.draw(m, player.mapNum);
            m = m+2;
            if(m>= backGround.getH()){
                m = 0;
            }
我的飞机的绘制
使用的飞机素材图片:
飞机扇动翅膀的原理与视频的原理相同,不停更换图片,形成视觉暂留效果
//这里仅使用了三张图片来回切换,更多的图片会有更好的效果
public void draw(int i){    //此处的i是用来控制显示哪一张图片的
        int j = i%30; // 150ms换一张
        if (j<10){
            g.drawImage(plane_img,x,y,x+sizeX,y+sizeY,0,0,sizeX,sizeY,null);
        }else if(j<20) {
            g.drawImage(plane_img,x,y,x+sizeX,y+sizeY,0,sizeY,sizeX,2*sizeY,null);
        }else if(j<30){
            g.drawImage(plane_img,x,y,x+sizeX,y+sizeY,288,0,424,112,null);
        }
    }
敌方飞机,敌方子弹等飞行物的绘制原理与MyPlane相同,后面不在赘述。(为了简化开发流程,飞行物可以不”扇动翅膀“)
移动线程
- 我们已经给每个飞行对象设置了X轴移动速度和Y轴移动速度,所以每次移动的时候,我们只需要遍历所有的飞行对象,
- 然后逐个移动一个speedX 和 speedY 单位即可。
- 多久移动一次呢?和绘制线程的间隔时间相同就好了,我们都设为30ms.
- 当飞行物飞出屏幕时,将飞行物移出集合,减少计算机资源的消耗。
如何控制我的飞机移动?
- 当然是通过键盘的 ↑ ↓ ← → 来控制了,我们需要设置一个键盘监听器给game界面,
- 注意要先使用 game.requestFocus(); 获取焦点,键盘监听器才可以使用。
 @Override
        //键盘按压时,设置速度
    public void keyPressed(KeyEvent e) {
        int c = e.getKeyCode();
        if(DrawThread.myPlane!=null){
            switch (c){
                case 37:
                    DrawThread.myPlane.setSpeedX(-speed);
                    break;
                case 38:
                    DrawThread.myPlane.setSpeedY(-speed);
                    break;
                case 39:
                    DrawThread.myPlane.setSpeedX(speed);
                    break;
                case 40:
                    DrawThread.myPlane.setSpeedY(speed);
                    break;
            }
        }
    }

@Override
        //键盘释放时,速度设为0
    public void keyReleased(KeyEvent e) {
        int c = e.getKeyCode();
        switch (c){
            case 37:
            case 39:
                DrawThread.myPlane.setSpeedX(0);
                break;
            case 38:
            case 40:
                DrawThread.myPlane.setSpeedY(0);
                break;
        }
    }
敌方飞机线程 : 如何生成敌方飞机呢?
每隔一段时间,在游戏面板的顶部,产生一个敌方飞机
/**
* @author liTianLu
* @Date 2022/5/22 0:30
* @purpose 产生敌机的线程
*/
    @Override
    public void run() {
        int sleepTime  = 800;
        while (true){
            if(DrawThread.player.score>=500){  //当分数高于500时,加快敌机产生的频率
                sleepTime = 300;
            }
            EnemyPlane enemyPlane = null;
            try {
                enemyPlane = new EnemyPlane();
            } catch (IOException e) {
                e.printStackTrace();
            }
            enemyPlanes.add(enemyPlane);
            new Thread(new EnemyBulletThread(enemyPlane)).start(); //启动一个发射子弹线程
            try {
                sleep(sleepTime+ random.nextInt(300));
            } catch (InterruptedException e) {
                e.printStackTrace();
            }
        }
    }
敌方子弹线程 : 使每一个敌方飞机开火
我们为每一个敌方飞机创建一个生成子弹的线程,要确定子弹产生的具体位置,就要知道敌方飞机的位置,所以我们要传入一个敌方飞机对象给该线程。
public EnemyBulletThread(EnemyPlane enemyPlane){
        this.enemyPlane = enemyPlane;
    }
    @Override
    public void run() {
        try {
            sleep(2000);
        } catch (InterruptedException e) {
            e.printStackTrace();
        }
        while(enemyPlane.isAlive() ){
            EnemyBullet enemyBullet = null;
            int enemyBullet_x = enemyPlane.getX()+25;
            int enemyBullet_y = enemyPlane.getY()+66;
            try {
                enemyBullet = new EnemyBullet(enemyBullet_x,enemyBullet_y);
            } catch (IOException e) {
                e.printStackTrace();
            }
            enemyBullets.add(enemyBullet);
            try {
                sleep(2000+ random.nextInt(2000));
            } catch (InterruptedException e) {
                e.printStackTrace();
            }
        }
    }
检测碰撞线程 : 在子弹与敌机碰撞时,移除敌机
- 此时我们会遇到一个问题,就是在遍历时,move移动线程有可能将其中的一个飞行物移出集合,会出现IndexOutOfBoundsException异常
- ,我们只需要在两个线程使用飞行物集合时,加上synchronized关键字,即可解决。
- MoveThread 遍历我的子弹集合
synchronized (MyPlane.myBulletList){
    if(MyPlane.myBulletList.size()!=0){
        for (int i = 0; i < MyPlane.myBulletList.size(); i++) {
            MyPlane.myBulletList.get(i).setY(MyPlane.myBulletList.get(i).getY()+MyPlane.myBulletList.get(i).getSpeedY()    );

            if(MyPlane.myBulletList.get(i).getY() <= -100){
                MyPlane.myBulletList.remove(i);
                continue;
            }
        }
    }
}
TestCrashThread 检测我的子弹与敌方飞机碰撞
synchronized (MyPlane.myBulletList){
    for (int i = 0; i < MyPlane.myBulletList.size(); i++) {
        for (int j = 0; j < EnemyPlaneThread.enemyPlanes.size() ;j++) {
            if(MyPlane.myBulletList.get(i).judge_crash(EnemyPlaneThread.enemyPlanes.get(j)) ){
                EnemyPlaneThread.enemyPlanes.get(j).setAlive(false);  //关线程
                DrawThread.player.score+=5; //分数+5
                EnemyPlaneThread.enemyPlanes.remove(j);
                MyPlane.myBulletList.remove(i);
                j = -1;
            }
            if(i >= MyPlane.myBulletList.size()){
                break;
            }
        }

    }
}
其他功能:显示玩家hp,掉落道具,得分,升级,更换地图
- 显示hp:每次检测到我的飞机与敌方飞机,敌方子弹碰撞,就减分。减到<=0时,游戏结束。
- 得分:子弹打到敌方飞机时,加分,并将当前分数通过绘制线程绘制在屏幕上。
- 掉落道具:敌机消失的时候,随机掉落一个道具,我的飞机碰到道具时,回血/加分/升级
- 升级:我的飞机初始为1级,最高为3级,等级改变时,使用switch 根据等级改变我的飞机的子弹发射方式。
- 更换地图: 使用一个新的窗体,设置几个单选按钮,选择时通过监听器,改变地图的控制变量,从而改变地图的绘制。

源码下载:
链接: http://pan.baidu.com/s/1ORdS-Ep0MNmVsslv9YFjiQ
提取码: hvz4
加载全部内容